
We are beginning our journey in late summer, mid July in the Pacific Northwest. It has been a dry, long, incredibly warm spring and summer, so the bees are really into their late summer housekeeping. The nectar flow is nearly over, and is (with the early and dry bloom of blackberries now done) vastly reduced. This will mean increasing crankiness on the part of the bees, who are hungry, and defensive of their hard-won honey stores. Robbing, both from neighbouring colonies and wasp species, is a clear and present danger, adding some excitement to what is normally a quiet time in the beekeeping year.
I will present the week’s information topics in outline form, and will add a summary our group discussions at the end of the post once that discussion has taken place. Helpful comments and advice from advanced beekeepers are welcome!
Week One:
Recommended Reading for the week is Randy Oliver’s “Rules for Successful Beekeeping”. Randy says it all best, but I can add that there are two important learning curves to beekeeping: book learning and practical application. You can read all about bees and beekeeping, all the research, all the online forums, and amass a very helpful and valuable hoarde of information in a very short time.
And you should.
But the practical learning curve is much longer and steeper. As a new-bee, you open up your hive and have simply no idea what you are seeing. You can’t really sit there with a book in one hand and figure it out because once you open the hive you are on borrowed time: the bees will tolerate you hovering over them and shifting things around, but not for long.
So in each inspection you are amassing experience. And in each inspection, you will not see all that can be seen over the course of the life of a hive. You may or may not see effects of a disease, or pest. You may or may not see the signs that the colony is in reproductive (swarming) mode, or hungry, or crowded, or upset by some outside agent. But in time, over the course of years, and especially if you end up seeing lots of colonies, you will see a wide range of things, and gain an understanding of the arc of the colony year.
So new-bees, inspect your colony/colonies every week to 10 days if possible (warm, sunny days…which don’t arrive on order, so use Accuweather to look ahead and plan your inspection opportunities), and take notes on what you see. There is a big anti-inspection movement in the bee world right now, and you may hear or read comments that say “I leave my bees alone and they are better for it”.
My reply is “how would you know?”
Without inspections you can only surmise, not know, what is happening in the hive. And without doing regular inspections as a new beekeeper, you will not progress along that practical learning curve. So inspect!
As I have said, we are beginning after midsummer. Each student is being assigned a small hive (small because they have been repeatedly harvested for nuc production) that they will care for until the end of the summer, which here is about 6 weeks away. If possible these students will take the hives through to winter wrap-up…depends upon return to post secondary etc.
However, that makes our first lesson Inspection Technique.
Note how Paul Kelly, beekeeper extraordinaire, moves his hands and frames quietly, gently, and with no bumps or vibrations! This is the key to a peaceful, helpful inspection.
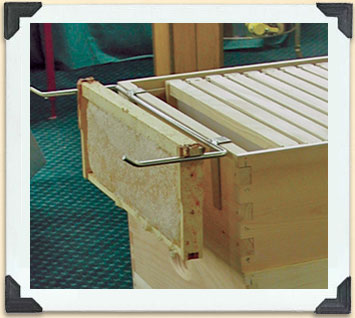
Paul puts his first frame to one side as he works…and this is standard practice in big beeyards. My beeyard is small and I have time, so I use a frame rest to hold the extra frames…it holds up to three, which is plenty:
Paul cages his queens when he finds them and then can work the hive worry free. You can also put the entire frame on which you find the queen into a nuc box while you work. That way you KNOW where she is and that she is safe. It is surprisingly easy to lose or kill your queen.
Pre-inspection, think about what your inspection is meant to accomplish, keeping in mind that depending on what we find in the colony, objectives may change. That can make the notes from your last inspection(s) invaluable as a guide to your next inspection. So, refer to notes if you have them, and prepare.
We are assuming you have chosen proper inspection weather: it will be warm, at least over 15C/59F, little or no wind, and if you inspect in the afternoon the foragers will all be out foraging and out of your way…much easier to see brood and queen. Bees hate being disturbed in cold, windy, or wet weather. They also become increasingly fractious in the nectar dearth that is late summer…by September they are upset easily, and defensive of their winter stores.
Check your bee kit: the first items of importance are your charged and working cell phone, your epipen, your bottle of Benadryl. I am not allergic to honey bees but I carry an epipen ALWAYS. In quantity, bee stings are lethal, and the epipen can save your life. Do not beekeep without an epipen, and a charged phone with which you can call for medical help.
NOTE: at first bee stings will probably give you a reaction (which is not the same thing as true allergy). The sting site will swell and get hot, and later be maddeningly itchy. For most of us, those reactions lessen over time as we are stung in the course of bee inspections. IF YOUR STING REACTIONS GET PROGRESSIVELY MORE INTENSE, BE CAREFUL!!!! You may be developing a lethal sensitivity. Always have your epipen, charged phone, and Benadryl liquid. Be ready to call Emerg if the reaction turns into anaphylaxis. If your sting reactions are getting more intense, stop beekeeping alone. Things can get bad very quickly, and you may only have 5 minutes before you pass out.
Ok. Read the above twice and on to less scary things…
You will also need at least a good bee tool and smoker. And an escape plan in case things go wrong…more on that below.
Light the smoker: I used to make my own smoker packets from burlap rolled up with fine wood chips and dried catmint: they smoke for a long time. The wood pellets sold for fueling pellet stoves are also great smoker fuel, and are inexpensive bought in hardware stores. Wood stove pellets make great, inexpensive smoker fuel!
I now use wood chips (aka hamster bedding, you can buy a big bale in the pet food or feed store) and horse stall pellets (which are less dense that the wood stove variety, and are easier to light).

You don’t want to have the smoker go out at a critical moment, particularly in an urban or community garden setting. I used to light the smoker with a butane torch, which is speedy and reliable. Canisters of butane are available in hardware stores for around $6 and will last a few years. The torch end can be ordered online or got at a cooking supply retailer. I found mine at Russell Food Equipment in Vancouver, also available from Amazon.
These days I use a small propane torch with a pushbutton integrated flint lighter. About $30 at any good hardware store.
Have a water mister on hand: once the initial smoking is done (and wait TWO minutes after smoking to allow bees to gorge on honey), you can use a fine water mist to clear bees out of your way. If the water mist stops working, go back to smoke, and if that stops working, and the bees are cranky (as they are in late summer/fall), close up the hive and try again another day.
Put up your hair (ponytails are the first rule of the beeyard) so any guard bees who get snarky do not get tangled up with your “do”. Bees are covered in tiny hairs, making them instant velcro in your hair. They will then panic, shoot off alarm pheromone (which smells like cheap banana flavouring) and more guards will race to the defense while the first one stings you in the head. So tie back your hair, put on a hat or kerchief if you can, and when the guard bees go for your face, put on your veil. Tip: if a bee gets tangled in your hair and starts that high, keen buzzing, squash it. I know that sounds cruel, but if you don’t kill the bee, and manage to free it without it stinging your fingers, 9 times out of 10 it will immediately fly at you and sting your closest part…usually your face. Up to you, but now when I have a serious entanglement I usually sacrifice the bee. I do say “sorry, sweetie”!

Suit up. I know, it’s hot! But it is important to be relaxed as you bee-keep, and in your first year(s) of beekeeping, you are going to be uncomfortable surrounded by all those stinging insects. You are also going to be refining your technique such that bees do not become aroused…that takes time and practice. Be relaxed and feel safe in your suit and veil while you work.
To stay cool on hot days, you can wear a wet tee shirt under the bee suit and/or wrap a wet bandanna around your neck. I keep a flat of water in the bee bench….beekeeping is thirsty work!
NOTE: the veil, suit and gloves are essential when you are doing (and you will be) something that upsets the bees. Sometimes we have to do a really invasive inspection (ie. looking for a queen to sell, finding disease, treating for pests or disease, moving a colony) and then you must, must, must put on your protective gear. Bee stings in quantity can be lethal regardless of your allergy status. So have that gear on or at hand, and have an escape plan in case things go sideways!!! And someday, they will go sideways…a box is dropped or a hive is knocked over. My escape plan is to run to my truck, which is left with the windows UP, just in case. At home I can run into the house and shut the door. Once I am in a place where the guard bees can’t get to me, I deal with the bees still stinging me, and figure out what to do next.
But as soon as possible, ditch the beekeeping gloves. You will need them when we have to do invasive things to the bees, as when you are turning out sick bees onto fresh equipment, or on a day when they are in a bad mood, etc. So buy the gloves. But as far as is possible, work without them. It teaches you to have quiet hands, to move without bumping the frames or crushing bees, and improves your dexterity. Bees once upset are far more focused on going for your face than your hands. So ditch the gloves and retain the veil!
Get the wash bucket prepped. To prevent spread of disease, each hive has its own tool, and we wash our hands in soapy, bleachy water between hives.
Smoke the hive to be inspected gently…first at the door, then the upper entrance if there is one, then a bit under the outer cover. Wait a minute or two for the ladies to fill up on honey, then crack the inner cover and puff in a few puffs there too. Moving slowly and causing minimal vibration, inspect.
Stand beside, not in front of or behind, the hive. This gives you the optimal position for working the frames, and keeps you out of the foragers’ flight path.
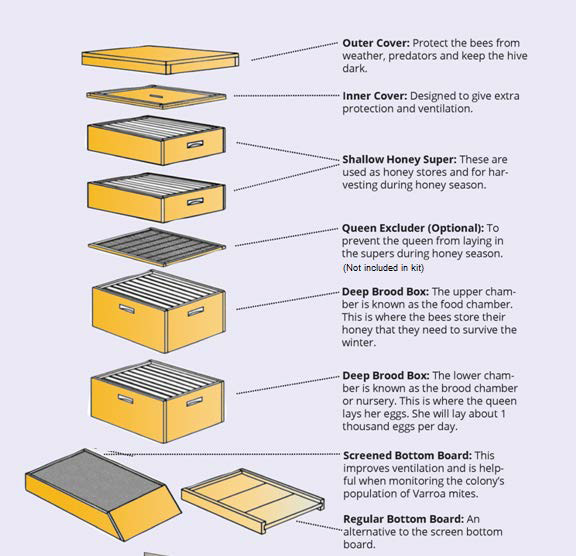
Where there are multiple supers on the hive, put the lid upside down on the ground or a short, stable surface, and take all the supers off but the last one, and cover the top super in the stack taken off with a cover cloth.
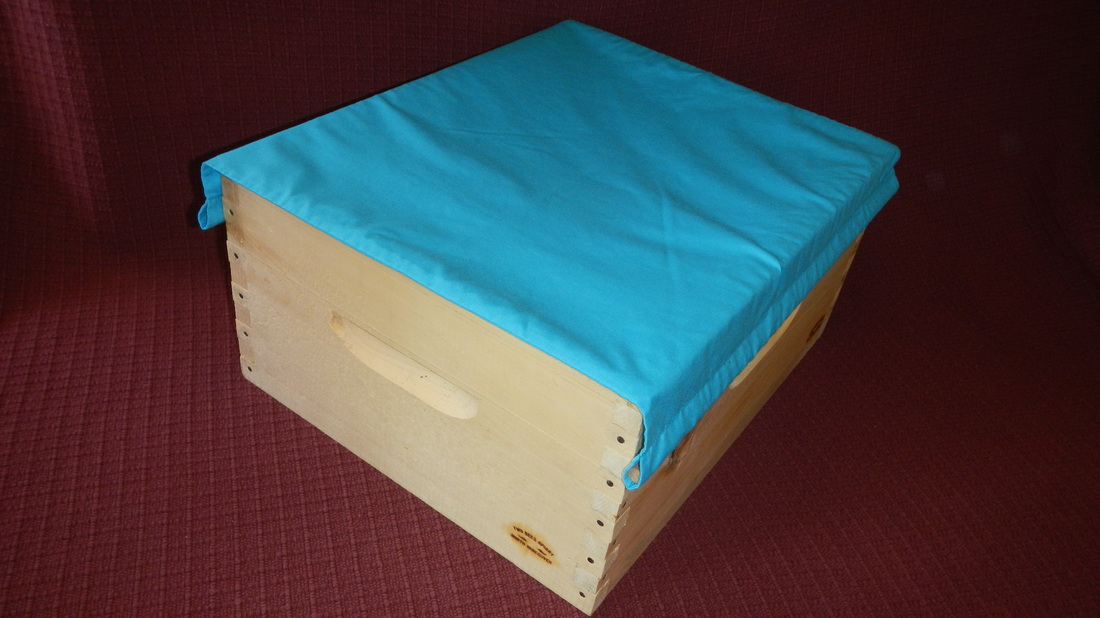 The cover cloth keeps the bees quiet and off the top edges of the super while we inspect another super (box).
Do your inspection, reassembling the hive as you go, and make your notes on what you have seen once the hive is back together. We will discuss what we have found, and what that means, with reference to where we are in the beekeeping year.
The major points to cover in any inspection are:
- Is the brood healthy? larvae that are white, wet, and glistening.
- Is the brood healthy? Yes, Virginia, it is that important!
- Are there eggs in the hive? (usually in the centre of the broodnest, where most of the bee activity will be)
- Do the bees look healthy, normal, active?
- How are they doing for stores of nectar/honey and pollen?
Try to get a feel for what a normal colony looks like…the frames next to the sides of the box are usually full of stores (honey and pollen). As you get toward the middle frames, where you will likely see most of the bees, you will find brood and eggs (and usually the queen is in the middle of the crowd).
***Critical Tip and Trick***
If you are starting with a package or nuc, keep an eye on the rate at which brood is being laid and capped. In every inspection, look for eggs, larvae and capped brood. A healthy hive will expand steadily through the spring until late June, and every time you look inside, should be taking up more and more frames to live on. If you do not see expansion, if they stay the same size as when you bought them, or suddenly stall out, reach out for help. ALL spring/early summer colonies should grow visibly between inspections! Most colony failures can be fixed if you catch the lack of expansion early.
With every inspection, you grow your sense of what a healthy, normal colony looks like. But at first it will all seem confusing. Persevere! Soon you will have a feel for whether what you are seeing is expected….and if you find the unexpected, you will reach out to bee mentors and advisors for help interpreting what you have seen.
We’ll discuss all that more in the Week One Notes.
Other topics we’ll cover this week:
1. Bee biology…queen, drone, worker. Additional reference here.
2. Genetic diversity in the hive…how to get it and why it is important.
3. The arc of development of a typical colony over the course of the beekeeping year (.pdf link)
4. Organization of the colony within the hive, and how that changes with the seasons.
5. What to do when stung (beginning with immediate removal of the stinger, and staying calm)
6. What to put in your bee kit (first items of importance: an epi-pen and charged cell phone!).
7. Setting up your beeyard notebook.

Finally, our weather reference…in this glorious summer we have not had to worry about rain and limited access to the hives. Inspections can pretty much be done any day, because they have all been warm and sunny. But in a normal year, we are usually looking ahead and planning for sunny days to coincide with our free time. It can be very difficult to get the kind of access we want to the hives, and requires careful planning, particularly if we are on a timeline ie. raising queens.
I have found for our area the best weather forecast tool is Accuweather. I use the monthly forecast option often to plan beeyard activities: this became critical as my bee holdings grew and I had multiple hives and yards to inspect. We will be using the Point Roberts, WA forecast, which seems most accurate for our area, which gets remarkably different weather than nearby Vancouver, BC, Canada.


In week one the Link to ” mine at Russell Food Equipment in Vancouver.” is not correct
LikeLike
We’ll discuss all that more in the Week One Notes.
.
3. Arc of. Development link does not work. (Country rubber link)
LikeLike